Now that you have Mad God’s Overhaul downloaded and installed, you can manage the installed list and launch the game via Mod Organizer 2 (MO2).
If you’ve created a shortcut, use that to launch MO2. If not, find ModOrganizer.exe in your MGO installation folder, and launch it from there.
MO2 takes a little while to start. Even the splash screen may not appear right away. Resist the temptation to launch it again. Just wait.
Full load order
Quick Start

When MO2 has finished loading, you can launch the game with the Run button near the upper-right, with Launch MGO - Do Not Unlock selected in the nearby dropdown. You should always launch MGO this way. Don’t just run Skyrim VR from Steam. That will launch the vanilla (unmodded) game. To play MGO, you need to run it from MO2.
Skip to the game
Before jumping into Tamriel, you should take a quick look around MO2, especially the onboarding section labeled START HERE - Expand for Setup .
Mods & Plugins
Mod Organizer 2’s interface is basically split in two: mods on the left, plugins on the right.
The left pane is the mod list. In MGO, mods are collected in folders. You can expand each folder by clicking the arrow to the left of each one.
Within the folders are the actual mods. Most of them are packaged mods that you can download from Nexusmods or somewhere similar. Others are specific to MGO. If the box is checked, that mod is enabled. If it’s unchecked, the mod is disabled, and will not be included when you run the game.
Many, but not all, of the mods listed in the left pane have corresponding plugins on the right. We’ll get into what makes plugins special in a later section. MGO is pre-configured so that you never need to worry about it unless you want to start fiddling with the list yourself.
Before you play…
You don’t need to know everything there is to know about MO2 before playing for the first time. MGO is pre-configured with sensible default, but it’s worth taking a moment to do some initial configuration. Synergy Team has made it pretty straightforward.
Scroll down the mod list until you see a folder labeled START HERE - Expand for Setup . As the label suggests, there is where you should start.
If you open the START HERE folder, you’ll see subfolders labeled STEP 1, STEP 2, etc.
You can filter the list with the text box at the bottom of the left pane to find “START” quickly.
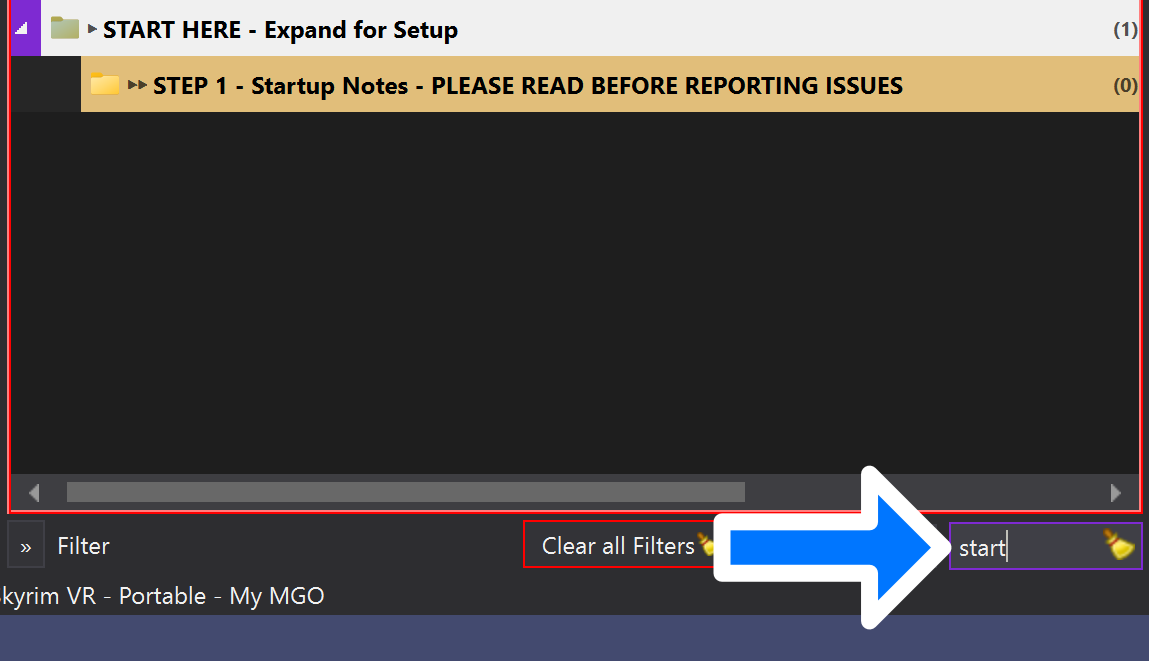
Startup Notes
STEP 1 doesn’t include any actual mods, but rather some important notes for using MO2 and running the game.
- PLEASE FOLLOW PROVIDED DOCUMENTATION FOR SETUP - Good news: that’s the site you’re reading right now. You’re already following instructions beautifully.
- DO NOT ADD YOUR OWN MODS TO THE BETA - MGO 4.0 is still in beta—a testing period. At this stage, the team is looking for feedback on the mod list as they’ve developed it. To be part of that process, please resist the temptation to throw in additional mods.
- DO NOT Click [ Unlock ] After Launching Game - When you run the game, MO2’s interface will lock to keep you from accidentally messing with it while the game is running. The dialog box that opens will include an Unlock button. This entry in the list is to remind you not to click that button.
- DO NOT Use LOOT to Sort Plugins - LOOT is a tool that automatically sorts plugins (the files listed on the right side of MO2) to be loaded in an order that’s better optimized than if you just added them without much thought. The plugins in Mad God’s Overhaul have already been sorted. You shouldn’t mess with that order.
Preferred Runtime
VR runtime refers to the software layer that sits between a VR application or game (Skyrim VR in this case) and your VR headset. Step 2 asks you to choose between OpenComposite and SteamVR. As the folder name insists, pick ONE: everything runtime-specific lives in the two subfolders here.
OpenComposite (Unleashed)
OpenComposite is the right choice for most players. MGO includes OpenComposite Unleashed, which works fine with SteamVR-native headsets and includes a number of features beyond just translating VR-related API calls. It’s great!
You should probably go with OpenComposite unless you know that you have a really good reason to choose SteamVR—like a treadmill, trackers, or some other accessory that strictly requires using the SteamVR runtime.
To choose it, enable the single mod (with the really long label) in the Open Composite folder. That’s OpenComposite Unleashed itself, and its label doubles as instructions: the included configurator app lives in the mod’s folder (right-click the mod and select Open In Explorer to find it). The configurator has options for OCU’s built-in keyboard, changing your key bindings, upscaling, and more. Seriously, read up on it if you haven’t yet.
SteamVR
The Controller Bindings folder provides three alternate control schemes. Skyrim VR’s default controls were designed for the Vive Wands, and they weren’t designed with today’s mods in mind. (In all fairness, they didn’t exist yet.) Choose only one of these. If they’re all disabled (and you’re not using OC Unleashed), Skyrim VR’s default controls will apply.
OC Unleashed compatibility
Switching from OpenComposite back to SteamVR
Unchecking the OpenComposite mod isn’t enough on its own. The files OCU generates while it runs can conflict with SteamVR, so you also need to clear them out:
- Delete the shadercache folder from your Skyrim VR installation folder.
- Clear MO2’s Overwrite: right-click Overwrite and choose Clear Overwrite… .
Skip these and Skyrim VR may crash or render incorrectly on SteamVR until the old caches are gone.
Performance Options
Step 3 includes a few performance-related presets.
The Community Shaders presets are split by GPU brand. Open the folder that matches your video card (NVIDIA or AMD), then select Quality, Balanced, or Performance. Enable one preset total, not one per folder. The labels are self-explanatory, but when has that ever stopped me? The Quality presets include all the visual bells and whistles, but have a fairly significant impact on your frame rate. Performance is more forgiving, and it still looks good. Balanced, as you might expect, sits between the two. (And as those long labels say, you can press END on your keyboard to customize Community Shaders further, though that will prompt shaders to re-compile.)
Heed the warning about OCU too: Don’t combine these presets with OCU’s upscalers. Upscale in one place or the other, never both. (The Community Shaders page covers this in more detail.)
Grass Density and LOD Distance each offer an optional Quality preset here. Left unchecked (the default), you get the lighter performance versions. Check one to trade frames for denser grass or better-looking distant objects. Both impact FPS when outdoors, so be aware of the trade-off.
LOD?
Where did the Target FPS step go?
Optional Mods
MGO includes a number of optional mods across several categories. They’re all tested and known to work with the list, but most are disabled by default.
Sync Plugins after enabling
AI and Speech
This section includes mods for incorporating AI NPCs into the game via SkyrimNet and its plugins, as well as voice features in both directions: Say It listens to you, and Dragonborn Voice Over gives your famously silent character a speaking voice.
SkyrimNet
SkyrimNet and its plugins offer LLM-powered NPCs and can even invent game scenarios. There’s enough to it that it gets its own section on this site.
Focus!
Say It
Say It - Dragonborn Voice Control adds voice recognition to the game, independent of SkyrimNet and other AI mods. You can control vanilla conversations with your voice—start conversations, speak your dialogue from among the avilable choices, and end conversations. You can perform shouts and powers, equip spells, use potions. You can even trigger console commands. It comes in two variants named for their speech-recognition engines, and you should enable one, not both. Vosk is lightweight, nearly instant, and the author’s recommended choice. WhisperGPU is heavier but can be more accurate with fewer false positives, and it requires an NVIDIA card.1 Check out the Nexus page for all the details.
Combat & Magic
New in RC3, this folder gathers up the optional mods that change how you fight and cast.
VRIK leaves your hands open (or tracks your fingers on supported controllers), regardless of whether your fists are drawn and you’re ready to brawl. VRIK Closed Fist addresses this, at long last. Enable this mod, and your hands become proper fists when they’re “unsheathed” (so to speak). Without it, you pretty much have to check whether your followers have their weapons drawn to know whether you’re ready to punch your foes, or just slap them.
Strange Runes gives spellcasting some pizazz, with glowing runic circles (55+ varieties, in fact) appearing when you or NPCs cast. Naturally, that’s configurable in the MCM.
If you want to give the runes a different look, Alternative Runes is a texture replacer for it. It’s an add-on, so only enable it alongside the original Strange Runes.
Spellsiphon - Immersive Combat is a whole dang system, not just a tweak, built around combos and the like. It’s meant to be learned in-game, and you can safely disable it mid-game, so why not give it a shot?
Convenience
The mods in the Convenience section are mostly self-explanatory, but I want to call attention to a couple of them.
Prisma UI AddItemMenu is a lightweight, fast, and feature-packed mod for adding any item from the game (or from mods!) to your inventory. It’s categorized and searchable, and it lets you consume items directly from the menu. This mod, courtesy of Wondernutts, saved the day when an older AddItem mod was sent to Oblivion, keeping many modlists (including some previous versions of MGO) from being downloadable. This one also happens to be much, much better.
Insects Begone REDUX is the mod you’re looking for if you have arachnophobia, or just don’t care to see arachnids and other creepy-crawly things in VR. Enable this mod, and they’ll be replaced.
MGO has historically advised against using Skyrim’s AutoSave feature. My Minimalistic AutoSave Mod is meant to be relatively unobtrusive, and because it’s configured to use full saves, it ought to actually work. (Full saves do cause a bit more of a stutter than the unsafe quicksaves, so keep that in mind.)
Difficulty
As your Skyrim character progresses, you’re likely to become an unstoppable killing machine. With all of the spells, perks, and content added by mods, this can happen even faster. In short, the game is too easy.
Arena balances things out a bit by adjusting the enemies that appear in each location.
Meanwhile, MGO’s combat runs on Blade and Blunt, a combat overhaul built to make Skyrim harder and to encourage active resource management. The optional Adjusted Difficulty Scaling entry in this section is a companion to it. Enable it if you want to add even more to that challenge.
Immersion
Immersion is a high priority for MGO. The list includes a number of mods to help you feel like you’re really in Tamriel, many of which are enabled by default. This section includes a few more optional mods that can enhance your playthrough, depending on your taste. Here are a couple worth calling out.
DovaVR Locomotion allows you to walk by swinging your arms. Check out the Movement page or the mod’s Nexus page to read more.
New in this release, Physical Collision VR replaces Fake Edge VR as MGO’s weapon-collision mod. It’s part of the core list now (on for everyone, not one of the optional toggles above), so there’s no checkbox to find. Your weapons collide with the world around them (walls, tables, your shield) instead of clipping through, and they still attack as usual. Check its Nexus page for the details of how it works.
Even if you choose WhisperGPU, shouts are still recognized by Vosk under the hood. The Thu’um answers to only one engine. ↩︎